Kubernetes CRI(Container runtime interface) is introduced in experimental mode in Kubernetes 1.15 release. Kubernetes CRI introduces a common Container runtime layer that allows for Kubernetes orchestrator to work with multiple Container runtimes like Docker, Rkt, Runc, Hypernetes etc. CRI makes it easy to plug in a new Container runtime to Kubernetes. Minikube project simplifies Kubernetes installation for development and testing purposes. Minikube project allows Kubernetes master and worker components to run in a single VM which facilitates developers and users of Kubernetes to easily try out Kubernetes. In this blog, I will cover basics of Minikube usage, overview of CRI and steps to try out CRI with Minikube.
Minikube
Kubernetes software is composed of multiple components and beginners normally get overwhelmed with the installation steps. It is also easier to have a lightweight Kubernetes environment for development and testing purposes. Minikube has all Kubernetes components in a single VM that runs in the local laptop. Both master and worker functionality is combined in the single VM.
Following are some major features present in Minikube:
- Capability to run multiple Kubernetes versions
- Supports both CNI and Kubenet networking mode
- Web dashboard for configuration and monitoring
- Support of Docker and Rkt Container runtime
- CRI support in experimental mode
- Minimal volume support
- Supported in Linux, Mac and Windows
Installation
Minikube can be downloaded from here. Kubectl is the CLI utility to manage Kubernetes and this needs to be installed separately.
Minikube installation in Linux
curl -Lo minikube https://storage.googleapis.com/minikube/releases/v0.16.0/minikube-linux-amd64 && chmod +x minikube && sudo mv minikube /usr/local/bin/
Kubectl installation in Linux
curl -LO https://storage.googleapis.com/kubernetes-release/release/$(curl -s https://storage.googleapis.com/kubernetes-release/release/stable.txt)/bin/linux/amd64/kubectl && chmod +x kubectl && sudo mv kubectl /usr/local/bin/
Installation in Windows
For Windows, we can download “minikube-windows-amd64.exe” executable. kubectl can be downloaded using:
curl -LO https://storage.googleapis.com/kubernetes-release/release/$(curl -s https://storage.googleapis.com/kubernetes-release/release/stable.txt)/bin/windows/amd64/kubectl.exe
By default, Minikube uses Virtualbox hypervisor for starting the VM. Using “–vm-driver” option, we can use other hypervisors like vmfusion, hyperv.
For this blog, I have used Minikube running in Windows with Virtualbox.
Lets check the Minikube version after Minikube installation is complete.
$ minikube version
minikube version: v0.15.0
Lets check the supported Kubernetes versions with Minikube:
$ minikube get-k8s-versions
The following Kubernetes versions are available:
	- v1.6.0-alpha.0
	- v1.5.2
	- v1.5.1
	- v1.4.5
	- v1.4.3
	- v1.4.2
	- v1.4.1
	- v1.4.0
	- v1.3.7
	- v1.3.6
	- v1.3.5
	- v1.3.4
	- v1.3.3
	- v1.3.0
Kubernetes with Docker
Lets start Minikube with Kubernetes version 1.5.2. By default, Docker is used as Container runtime.
minikube start --kubernetes-version=v1.5.2
Lets list the cluster detail:
$ kubectl cluster-info
Kubernetes master is running at https://192.168.99.115:8443
KubeDNS is running at https://192.168.99.115:8443/api/v1/proxy/namespaces/kube-system/
services/kube-dns
kubernetes-dashboard is running at https://192.168.99.115:8443/api/v1/proxy/namespaces
/kube-system/services/kubernetes-dashboard
Lets list the node detail:
$ kubectl get nodes
NAME       STATUS    AGE
minikube   Ready     3h
As we can see in the above output, there is only 1 node that is serving both as master and worker node.
To ssh into the node, we can do “kubectl ssh”.
Lets start a simple nginx webserver.
kubectl run webserver --image=nginx --port=80
kubectl expose deployment webserver --type=NodePort
The above set of commands starts a Kubernetes deployment which in turn triggers creation of pod and replication set. The deployment is exposed as a Service. Kubernetes creates a IP for each service that can be accesssed within the cluster. In the above example, we have used service type “NodePort”. This allows the service to be accessed from external world.
Lets look at the deployment, replication set and pod created:
$ kubectl get deployment
NAME        DESIRED   CURRENT   UP-TO-DATE   AVAILABLE   AGE
webserver   1         1         1            1           1m

$ kubectl get rs
NAME                   DESIRED   CURRENT   READY     AGE
webserver-1505803560   1         1         1         1m

$ kubectl get pods
NAME                         READY     STATUS    RESTARTS   AGE
webserver-1505803560-wf3sh   1/1       Running   0          1m
Lets look at the service list:
$ kubectl get services
NAME         CLUSTER-IP   EXTERNAL-IP   PORT(S)        AGE
kubernetes   10.0.0.1             443/TCP        5h
webserver    10.0.0.93           80:30195/TCP   1m
In the above output, we can see that the service is exposed using clusterip “10.0.0.93” as well as using port 30195 on the kubernetes node.
If we ssh to the node, we can see the Docker container running:
$ docker ps | grep nginx
fb6a462a7095        nginx                                                        "ngin
x -g 'daemon off"   4 minutes ago       Up 4 minutes                            k8s_we
bserver.a9c43075_webserver-1505803560-wf3sh_default_075c2375-f059-11e6-90bf-080027d244
a1_a4843218
We can access the Kubernetes dashboard at “nodeip:30000”
As part of cleanup, we can delete the deployment and service.
kubectl delete service webserver
kubectl delete deployment webserver
To delete the cluster, we can do the following:
minikube delete
Kubernetes with Rkt
Rkt is a Container runtime from CoreOS. Rkt does not have a daemon like Docker. Systemd manages the Container processes.
Now, lets start Minikube with Rkt as the Container runtime.
minikube start --kubernetes-version=v1.5.2 --container-runtime=rkt
To check that Rkt is the runtime, we can confirm this with minikube logs.
minikube logs | grep -i rkt
We can start the nginx service using the same commands that we used earlier:
kubectl run webserver --image=nginx --port=80
kubectl expose deployment webserver --type=NodePort
Now, we can see that the Rkt container is running rather than Docker container:
$ rkt list | grep nginx
80f54c9e        webserver               registry-1.docker.io/library/nginx:latest    r
unning  52 seconds ago  51 seconds ago  rkt.kubernetes.io:ip4=10.1.0.4, default-restricted:ip4=172.16.28.4
In the above example, Docker nginx image was used to start Rkt container. The image format conversion happens automatically.
Kubernetes CRI
Before Kubernetes 1.3, Docker was the only Container runtime supported in Kubernetes. As part of Rktnetes project, Rkt was added as Container runtime in Kubernetes 1.3 version. The example illustrated in the previous section used Rktnetes.
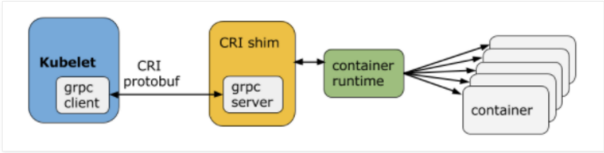
The architecture of Kubernetes is that the apiserver with scheduler runs on the master node and kubelet runs in all worker nodes. Kubelet talks to the container runtime engine in the worker node to start the Containers. With this architecture, there was close interaction between Kubectl and Container runtime which needed Kubectl to be aware of the specific Container runtime engine. There were changes needed in kubectl for every new Container runtime which made code maintenance difficult. In Kubernetes 1.5 release, CRI(Container runtime interface) was introduced to make a clean interface between Kubectl and Container runtime. This allows for any new Container runtime to be easily plugged into Kubernetes. GRPC mechanism was introduced between kubectl and Container runtime shim layer. GRPC provides 2 services. The ImageService provides RPCs to pull an image from a repository, inspect, and remove an image. The RuntimeService contains RPCs to manage the lifecycle of the pods and containers. CRI is available as a experimental feature in Kubernetes 1.5.
Following picture from CRI release blog shows the interaction between Kubectl and CRI shim layer:
Following are the Container runtimes that are in the process of integration with Kubernetes CRI.
- Docker – This is for Docker container runtime and is available as a experimental feature in Kubernetes 1.5.
- Rktlet – This will supersede Rktnetes and will support Rkt Container runtime.
- OCI – This integrates with OCI compatible runc
- Hypernetes – This Container runtime runs Container inside lightweight VM.
Following picture from hypernetes github page shows how the different Container runtimes interacts with Kubectl:

To start Minikube with CRI and Docker shim, we can use the corresponding CRI config flag:
$ minikube start --kubernetes-version=v1.5.2 --extra-config=kubelet.EnableCRI=true
To check that CRI is enabled, we can do the following:
$  minikube logs | grep EnableCRI
Feb 11 13:54:44 minikube localkube[3114]: I0211 13:54:44.908881    3114 localkube.go:1
17] Setting EnableCRI to true on kubelet.
Summary
Having Container runtime as a pluggable model inside Kubernetes is very important step that allows many Container runtimes to thrive. For example, Hypernetes Container runtime runs Container inside a small isolated VM environment and this might be useful for container applications needing better hardware isolation. The beauty of it lies in the fact that the interface from Kubernetes to start the Container remains the same irrespective of the Container runtime.
Minikube is a very easy way to get started with Kubernetes. The fact that it runs on Windows, Linux and Mac makes it universally useful. 1 missing feature is the capability to have multiple nodes. I see that few folks have made the same request and this might be in Minikube’s roadmap.
