Docker 1.12 release has revamped its support for Service Discovery and Load balancing. Prior to 1.12 release, support for Service discovery and Load balancing was pretty primitive in Docker. In this blog, I have covered the internals of Service Discovery and Load balancing in Docker release 1.12. I will cover DNS based load balancing, VIP based load balancing and Routing mesh.
Technology used
Docker service discovery and load balancing uses iptables and ipvs features of Linux kernel. iptables is a packet filtering technology available in Linux kernel. iptables can be used to classify, modify and take decisions based on the packet content. ipvs is a transport level load balancer available in the Linux kernel.
Sample application
Following is the sample application used in this blog:

“client” service has 1 client container task. “vote” service has multiple vote container tasks. Client service is used to access multi-container voting service. We will deploy this application in a multi-node Swarm cluster. We will access the voting application from client container and also expose the voting server to host machine for external load balancing.
I have used “smakam/myubuntu:v4” as client container and I have installed tools like dig,curl on top of base ubuntu container to demonstrate networking internals.
I have used Docker’s “instavote/vote container” as a voting server that shows container ID in output when accessed from client. This allows for easier demonstration as to the specific voting server container that responds to the client request.
Pre-requisites
I have used custom boot2docker image with ipvsadm and specific Docker version(1.12 RC4) installed. To build custom boot2docker image, please follow the procedure here in my earlier blog.
Following output shows the 2 node cluster running in Swarm mode. Node1 is acting as a master and worker. Node2 is acting only as worker.
$ docker node ls
ID                           HOSTNAME  MEMBERSHIP  STATUS  AVAILABILITY  MANAGER STATUS
259ebbe62k8t9qd9ttbiyq31h *  node1     Accepted    Ready   Active        Leader
631w24ql3bahaiypblrgp4fa4    node2     Accepted    Ready   Active
We need to install nsenter in boot2docker image. nsenter is a tool that allows us to enter into network namespaces and find more details on the namespace. This is useful for debugging. I have used the procedure here to install nsenter in a Container in Docker nodes.
Create overlay network:
Use following command in leader node to create overlay network “overlay1”. This should be done from master node.
docker network create --driver overlay overlay1
DNS based load balancing
Following picture describes how DNS based load balancing works for this application.
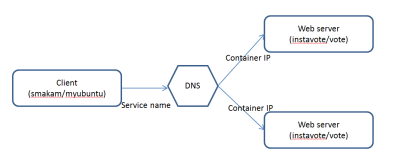
DNS server is embedded inside Docker engine. Docker DNS resolves the service name “vote” and returns list of container ip addresses in random order. Clients normally will pick the first IP so that load balancing can happen between the different instance of the servers.
Following commands create 2 services with DNS based load balancing.
docker service create --endpoint-mode dnsrr --replicas 1 --name client --network overlay1 smakam/myubuntu:v4 ping docker.com
docker service create --endpoint-mode dnsrr --name vote --network overlay1 --replicas 2 instavote/vote
Following output shows the services and tasks running:
$ docker service ls
ID            NAME    REPLICAS  IMAGE               COMMAND
4g2szdso0n2b  client  1/1       smakam/myubuntu:v4  ping docker.com
bnh59o28ckkl  vote    2/2       instavote/vote
docker@node1:~$ docker service tasks client
ID                         NAME      SERVICE  IMAGE               LAST STATE           DESIRED STATE  NODE
d8m0snl88oc5b4r0b4tbriewi  client.1  client   smakam/myubuntu:v4  Running 2 hours ago  Running        node1
docker@node1:~$ docker service tasks vote
ID                         NAME    SERVICE  IMAGE           LAST STATE           DESIRED STATE  NODE
7irycowzbryx0rglin0wfa670  vote.1  vote     instavote/vote  Running 2 hours ago  Running        node2
aqwopxnc8eg4qx9nqwqj099es  vote.2  vote     instavote/vote  Running 2 hours ago  Running        node2
Following output shows Containers running in node1 and node2:
docker@node1:~$ docker ps
CONTAINER ID        IMAGE                COMMAND             CREATED             STATUS              PORTS               NAMES
11725c3bfec0        smakam/myubuntu:v4   "ping docker.com"   2 hours ago         Up 2 hours                              client.1.d8m0snl88oc5b4r0b4tbriewi
docker@node2:~$ docker ps
CONTAINER ID        IMAGE                   COMMAND                  CREATED             STATUS              PORTS               NAMES
8d9b93f6847a        instavote/vote:latest   "gunicorn app:app -b "   2 hours ago         Up 2 hours          80/tcp              vote.1.7irycowzbryx0rglin0wfa670
6be7dc65655b        instavote/vote:latest   "gunicorn app:app -b "   2 hours ago         Up 2 hours          80/tcp              vote.2.aqwopxnc8eg4qx9nqwqj099es
Let’s login to client container and resolve the service name “vote” using dig. As we can see below, “vote” resolves to 10.0.0.3 and 10.0.0.4.
# dig vote
.
.
;; ANSWER SECTION:
vote.			600	IN	A	10.0.0.3
vote.			600	IN	A	10.0.0.4
.
.
Following example shows that ping to “vote” service resolves to IP 10.0.0.3 and 10.0.0.4 alternately:
# ping -c1 vote
PING vote (10.0.0.4) 56(84) bytes of data.
64 bytes from 10.0.0.4: icmp_seq=1 ttl=64 time=24.4 ms

--- vote ping statistics ---
1 packets transmitted, 1 received, 0% packet loss, time 0ms
rtt min/avg/max/mdev = 24.481/24.481/24.481/0.000 ms
root@11725c3bfec0:/# ping -c1 vote
PING vote (10.0.0.3) 56(84) bytes of data.
64 bytes from 10.0.0.3: icmp_seq=1 ttl=64 time=44.9 ms

--- vote ping statistics ---
1 packets transmitted, 1 received, 0% packet loss, time 0ms
rtt min/avg/max/mdev = 44.924/44.924/44.924/0.000 ms
If we do curl, we can see that the request resolves to only a single container.
# curl vote  | grep -i "container id"
          Processed by container ID 6be7dc65655b
root@11725c3bfec0:/# curl vote  | grep -i "container id"
          Processed by container ID 6be7dc65655b
This is because of the DNS client implementation as mentioned in this blog and RFC 3484. In this example, client container IP is 10.0.0.2 and the 2 server Container IPs are 10.0.0.3 and 10.0.0.4.
Following output shows the IP of the 2 Containers along with Container ID.
docker@node2:~$ docker inspect 8d9b93f6847a | grep IPv4
                        "IPv4Address": "10.0.0.4"
docker@node2:~$ docker inspect 6be7dc65655b | grep IPv4
                        "IPv4Address": "10.0.0.3"
Following are the binary representations:
10.0.0.2 - "..010"
10.0.0.3 - "..011"
10.0.0.4 - "..100"
Compared to 10.0.0.4, 10.0.0.3 has a better longest prefix match so curl request always resolves to 10.0.0.3 ip address since the DNS client in curl reorders the response received from DNS server. 10.0.0.3 Container IP address maps to Container ID 6be7dc65655b. This issue makes load balancing to not work properly.
DNS based load balancing has the following issues:
- Some applications cache the DNS host name to IP address mapping. This causes applications to timeout when the mapping gets changed.
- Having non-zero DNS ttl value causes delay in DNS entries reflecting the latest detail.
- DNS based load balancing does not do proper load balancing based on the client implementation. This is explained in this blog and in the example used in the above section.
VIP based Load balancing
VIP based load balancing overcomes some of the issues with DNS based load balancing. In this approach, each service has an IP address and this IP address maps to multiple container IP address associated with that service. In this case, service IP associated with a service does not change even though containers associated with the service dies and restarts.
Following picture shows how VIP based load balancing works for this application.
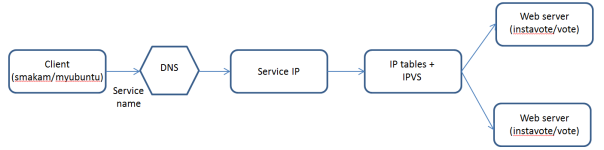
DNS would resolve the service name “vote” into Service IP(VIP). Using IP tables and ipvs, VIP gets load balanced to the 2 backend “vote” containers.
Following command starts the 2 services in VIP mode:
docker service create --replicas 1 --name client --network overlay1 smakam/myubuntu:v4 ping docker.com
docker service create --name vote --network overlay1 --replicas 2 instavote/vote
Following command shows the 2 services and their service IP.
docker@node1:~$ docker service inspect --format {{.Endpoint.VirtualIPs}}  vote
[{bhijn66xu7jagzzhfjdsg68ba 10.0.0.4/24}]
docker@node1:~$ docker service inspect --format {{.Endpoint.VirtualIPs}}  client
[{bhijn66xu7jagzzhfjdsg68ba 10.0.0.2/24}]
Following command shows the DNS mapping of service name to IP. In output below, we see that service name “vote” is mapped to VIP “10.0.0.4”.
root@9b7e8d8ce531:/# dig vote

;; ANSWER SECTION:
vote.			600	IN	A	10.0.0.4
Service IP 10.0.0.4 gets load balanced to the 2 containers using Linux kernel iptables and ipvs. iptables implements firewall rules and ipvs does load balancing.
To demonstrate this, we need to enter into Container network space using nsenter. For this, we need to find the network namespace.
Following are the network namespaces in node1:
root@node1:/home/docker# cd /var/run/docker/netns/
root@node1:/var/run/docker/netns# ls
1-1uwhvu7c4f  1-bhijn66xu7  934e0fdc377d  f15968a2d0e4
The first 2 namespaces are for overlay network and the next is for the containers. Following command sequence helps to find the client container’s network namespace:
root@node1:/var/run/docker/netns# docker ps
doCONTAINER ID        IMAGE                COMMAND             CREATED             STATUS              PORTS               NAMES
9b7e8d8ce531        smakam/myubuntu:v4   "ping docker.com"   37 minutes ago      Up 37 minutes                           client.1.cqso2lzjvkymjdi8xp0zg6zne
root@node1:/var/run/docker/netns# docker inspect 9b7e8d8ce531 | grep -i sandbox
            "SandboxID": "934e0fdc377d7a6f597beb3e43f06b9d68b74b2e7746df8be70693664c03cc28",
SandboxID is the client Container’s network namespace.
Using following command, we can enter into client container’s network namespace:
root@node1:/var/run/docker/netns# nsenter --net=934e0fdc377d sh
Now, we can see the iptables mangle rule and ipvs output. I have pasted relevant sections of iptables output below.
root@node1:/var/run/docker/netns# iptables -nvL -t mangle
Chain OUTPUT (policy ACCEPT 2265 packets, 189K bytes)
 pkts bytes target     prot opt in     out     source               destination
   14   880 MARK       all  --  *      *       0.0.0.0/0            10.0.0.4             MARK set 0x117
    0     0 MARK       all  --  *      *       0.0.0.0/0            10.0.0.2             MARK set 0x10b
    0     0 MARK       all  --  *      *       0.0.0.0/0            10.0.0.2             MARK set 0x116

Chain POSTROUTING (policy ACCEPT 2251 packets, 188K bytes)
 pkts bytes target     prot opt in     out     source               destination
root@node1:/var/run/docker/netns# ipvsadm
IP Virtual Server version 1.2.1 (size=4096)
Prot LocalAddress:Port Scheduler Flags
  -> RemoteAddress:Port           Forward Weight ActiveConn InActConn
FWM  267 rr
  -> 10.0.0.3:0                   Masq    1      0          0
FWM  278 rr
  -> 10.0.0.3:0                   Masq    1      0          0
FWM  279 rr
  -> 10.0.0.5:0                   Masq    1      0          0
  -> 10.0.0.6:0                   Masq    1      0          0
10.0.0.4 service IP gets marking of 0x117(279) using iptables OUTPUT chain. ipvs uses this marking and load balances it to containers 10.0.0.5 and 10.0.0.6 as shown above.
Following output inside client container shows that the service access to service name “vote” getting load balanced between 2 containers. In this case, we don’t see the issue as seen in DNS endpoint example.
root@9b7e8d8ce531:/# curl vote  | grep -i "container id"
          Processed by container ID a53dbd51d90a
root@9b7e8d8ce531:/# curl vote  | grep -i "container id"
          Processed by container ID 495f97274126
Following output shows the IP address corresponding to the 2 container IDs mentioned above:
docker@node2:~$ docker inspect 495f97274126 | grep IPv4
                        "IPv4Address": "10.0.0.6"
docker@node2:~$ docker inspect a53dbd51d90a | grep IPv4
                        "IPv4Address": "10.0.0.5"
Routing mesh
Using routing mesh, the exposed service port gets exposed in all the worker nodes in the Swarm cluster. Docker 1.12 creates “ingress” overlay network to achieve this. All nodes become part of “ingress” overlay network by default using the sandbox network namespace created inside each node.
Following picture describes how Routing mesh does load balancing:

The first step is mapping of host name/IP into the Sandbox IP. IP table rules along with IPVS in the Sandbox takes care of load balancing the service between the 2 voting Containers. Ingress sandbox network namespace resides in all worker nodes of the cluster. It assists with routing mesh feature by load balancing the host mapped port to backend containers.
Following picture shows the mapping between Sandbox, Containers and the networks of each node:

In picture above, we can see that Sandboxes and “vote” containers are part of “ingress” network and it helps in routing mesh. “client” and “vote” containers are part of “overlay1” network and it helps in internal load balancing. All containers are part of the default “docker_gwbridge” network.
Following commands creates the 2 services with host port in the “vote” service getting exposed across all Docker nodes using routing mesh.
docker service create --replicas 1 --name client --network overlay1 smakam/myubuntu:v4 ping docker.com
docker service create --name vote --network overlay1 --replicas 2 -p 8080:80 instavote/vote
Following command shows the services running in node1 and node2:
docker@node1:~$ docker service tasks vote
ID                         NAME    SERVICE  IMAGE           LAST STATE             DESIRED STATE  NODE
ahacxgihns230k0cceeh44rla  vote.1  vote     instavote/vote  Running 8 minutes ago  Running        node2
0x1zqm8vioh3v3yxkkwiwy57k  vote.2  vote     instavote/vote  Running 8 minutes ago  Running        node2
docker@node1:~$ docker service tasks client
ID                         NAME      SERVICE  IMAGE               LAST STATE             DESIRED STATE  NODE
98ssczk1tenrq0pgg5jvqh0i7  client.1  client   smakam/myubuntu:v4  Running 8 minutes ago  Running        node1
Following NAT rule in iptables shows that the host traffic incoming on port 8080 is sent to the Sandbox inside node1:
root@node1:/home/docker# iptables -nvL -t nat
Chain DOCKER-INGRESS (2 references)
 pkts bytes target     prot opt in     out     source               destination
    0     0 DNAT       tcp  --  *      *       0.0.0.0/0            0.0.0.0/0            tcp dpt:8080 to:172.18.0.2:8080
   74  4440 RETURN     all  --  *      *       0.0.0.0/0            0.0.0.0/0
We need to enter into the sandbox to check the iptables and ipvs rules mentioned there. This can be achieved by using nsenter. Following outputs are inside the sandbox of node1.
Following is the iptable mangle rule that shows marking set to 0x101(257) for packets destined to port 8080.
root@node1:/var/run/docker/netns# iptables -nvL -t mangle
Chain PREROUTING (policy ACCEPT 0 packets, 0 bytes)
 pkts bytes target     prot opt in     out     source               destination
    0     0 MARK       tcp  --  *      *       0.0.0.0/0            0.0.0.0/0            tcp dpt:8080 MARK set 0x101
Following is the ipvsadm rule that shows that any packets with firewall marking of 257 is load balanced to containers with ip address 10.255.0.6 and 10.255.0.7. Here ipvs masquerade mode is chosen whereby the destination ip address would get overwritten.
root@node1:/var/run/docker/netns# ipvsadm
IP Virtual Server version 1.2.1 (size=4096)
Prot LocalAddress:Port Scheduler Flags
  -> RemoteAddress:Port           Forward Weight ActiveConn InActConn
FWM  257 rr
  -> 10.255.0.6:0                 Masq    1      0          0
  -> 10.255.0.7:0                 Masq    1      0          0
Following output shows the load balancing working in node1 with ip address chosen as node1 IP and port 8080:
docker@node1:~$ curl 192.168.99.102:8080  | grep -i "container id"
          Processed by container ID d05886b1dfcd
docker@node1:~$ curl 192.168.99.102:8080  | grep -i "container id"
          Processed by container ID ee7647df2b14
Following output shows the load balancing working in node2 with ip address chosen as node2 IP and port 8080:
docker@node2:~$ curl 192.168.99.102:8080  | grep -i "container id"
          Processed by container ID d05886b1dfcd
docker@node2:~$ curl 192.168.99.102:8080  | grep -i "container id"
          Processed by container ID ee7647df2b14
Issues found
I was not able to get routing mesh working with DNS based service endpoint. I tried to create routing mesh with DNS service endpoint using the commands below:
docker service create --endpoint-mode dnsrr --replicas 1 --name client --network overlay1 smakam/myubuntu:v4 ping docker.com
docker service create --endpoint-mode dnsrr --name vote --network overlay1 --replicas 2 -p 8080:80 instavote/vote
Service got stuck in Init state. Based on discussion with Docker team, I understood that this is not yet supported and this will be blocked in Docker 1.12 official release. There are plans to add this feature to later release.

Great article, little remark, code blocks with commands and output are hard to read and chaotic, wider context block or code block with horizontal scrollbar would be really helpful.
changing `pre: white-space: pre-wrap;` to `pre: white-space: pre` did the job.
hi Lukas
Thanks for your feedback and suggestion. I did some digging in the internet and I was able to get it working using custom css stylesheet with “stylish” addon in chrome and firefox and overriding pre like you mentioned. Is that what you meant?
Is there any other way to get this working natively without using the option of overriding css?
Thanks
Sreenivas
Thanks a lot mate! This was exactly what I was looking for.
Thanks Ajmal for the feedback.
Reblogged this on iJuned.
It’s going to be end of mine day, except before finish I am reading this impressive paragraph to improve my know-how.
I was recommended this web site by way of my cousin. I’m no longer sure whether this
post is written by him as no one else recognise such particular about my trouble.
You are incredible! Thank you!
Thanks, appreciate the kind words.
Hmm it appears like your website ate my first comment (it was extremely long)
so I guess I’ll just sum it up what I had written and say, I’m thoroughly enjoying your blog.
I too am an aspiring blog blogger but I’m still new to the whole thing.
Do you have any tips and hints for rookie blog writers?
I’d definitely appreciate it.
Thanks for the feedback. My tip would be start on something small that you are passionate about, try different hands-on stuff with that technology/project and write about it.
I think this is among the so much vital information for me.
And i am glad reading your article. But should statement on some basic things,
The web site style is ideal, the articles is really excellent : D.
Good activity, cheers
There is a picture here about the nodes, the sandboxes and the different networks, I think that in node1 you have Sandbox1 and client, is that correct? We should have in each node one vote container, right?
The orchestration of containers to nodes depends on how Swarm does it. Its possible that both vote containers can be on same node. Using Swarm constraints, we can force that multiple containers of a single service can go to different nodes.
thanks for the tutorial. is it possible to use this technique to direct requests only to one container of global docker service deployed on multiple hosts? If this container goes down, requests will be forwarded to other running containers.
The only way i can think of is using external load balancer like nginx, but requires additional docker service.